


Android Date Picker Tutorial
In this tutorial i'm going to show you how date picker in the android works.The following steps show how it works.
1.Create a Project called DatePickerExample
Project Name : DatePickerExample
Package : com.roney.DatePickerExample;
Main Activity : DatePickerExample.java
Build Target : Android 4.0
2.Create a datepicker.xml file in res/layout.
For the beginners,am requesting to refer the default code of date picker.
3.Put the given bellow code in datepicker.xml file.
<?xml version="1.0" encoding="UTF-8"?><LinearLayout xmlns:android="http://schemas.android.com/apk/res/android" android:layout_width="wrap_content" android:layout_height="wrap_content" android:orientation="horizontal"> <TextView android:id="@+id/dateDisplay" android:layout_width="wrap_content" android:layout_height="wrap_content" android:paddingLeft="4dip" android:text="@string/hello"/> <Button android:id="@+id/pickDate" android:layout_width="wrap_content" android:layout_height="wrap_content" android:paddingLeft="4dip" android:text="@string/hello"/> </LinearLayout>
4.Inorder to create datepicker,we need to import some packages.They are:
import java.util.Calendar;import android.app.DatePickerDialog;import android.widget.DatePicker;
5.Put the bellow code to DatePickerExample.java file in src.
package com.roney.DatePickerExample;
import android.app.Activity;
import java.util.Calendar;import android.app.DatePickerDialog;import android.widget.DatePicker;import android.app.Dialog;import android.os.Bundle;import android.view.View;import android.widget.Button;import android.widget.TextView;public class DatePickerExample extends Activity { private TextView mDateDisplay; private int mYear; private int mMonth; private int mDay; static final int DATE_DIALOG_ID = 1; @Override protected void onCreate(Bundle savedInstanceState) { super.onCreate(savedInstanceState); setContentView(R.layout.date_picker); mDateDisplay = (TextView) findViewById(R.id.dateDisplay); Button pickDate = (Button) findViewById(R.id.pickDate); pickDate.setOnClickListener(new View.OnClickListener() { public void onClick(View v) { showDialog(DATE_DIALOG_ID); } }); final Calendar c = Calendar.getInstance(); mYear = c.get(Calendar.YEAR); mMonth = c.get(Calendar.MONTH); mDay = c.get(Calendar.DAY_OF_MONTH); updateDisplay(); } @Override protected Dialog onCreateDialog(int id) { switch (id) { case DATE_DIALOG_ID:
return new DatePickerDialog(this, mDateSetListener, mYear, mMonth, mDay); } return null; } protected void onPrepareDialog(int id, Dialog dialog) { switch (id) { case DATE_DIALOG_ID: ((DatePickerDialog) dialog).updateDate(mYear, mMonth, mDay); break; } } private void updateDisplay() {
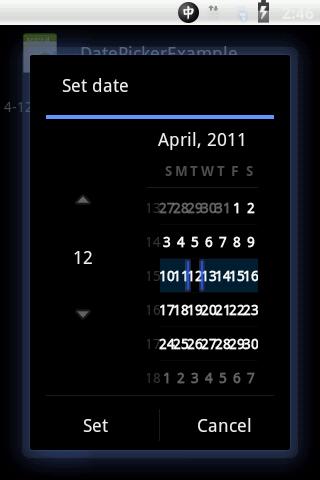
mDateDisplay.setText( new StringBuilder() // Month is 0 based so add 1 .append(mMonth + 1).append("-") .append(mDay).append("-") .append(mYear).append(" ")); } private DatePickerDialog.OnDateSetListener mDateSetListener = new DatePickerDialog.OnDateSetListener() { public void onDateSet(DatePicker view, int year, int monthOfYear, int dayOfMonth) { mYear = year; mMonth = monthOfYear; mDay = dayOfMonth; updateDisplay(); } };}6.Output is shown bellow
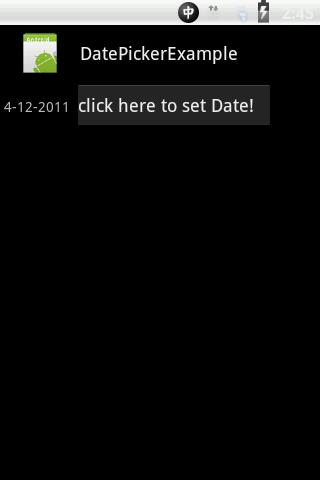
If you need to run this application in the android smartphone
Hope you understand how it works.
" Ask your doubts and comments please "


0 comments:
Post a Comment